Writing here after a long time just to post the transcription of the initial part of ProzaKc Blues by King Crimson.
The transcription is written for the piano. Here is a PNG version of it:
The PDF version, together with the MuseScore source files, is available on Google Drive. MIDI/MP3 files also available.
Siccome la gente che si laurea spesso ha di meglio da fare che inventarsi un layout per le slide da usare durante la discussione, ecco un template che ho fatto scopiazzando dalle diapositive di alcuni professori del DEI. Formato ODP e PPT.
I had to write this simple script for my thesis on acoustic simulations on a 3D model of a human head (HRTF stuff).
So this script iterates over all the selected edges of the current object and show the longest one's length (you have to look at the console to view the message).
It also writes the maximum frequency that can be calculated using the BEM according to a paper by Brian Katz:
Let me say it clearly: ASUS I Hate you.
Ok, actually I don't hate asus. They make great products. I'm just ranting about the fact that they limited their notebooks' media keys to work only with, say, Windows Media Player or Media Center.
I was a big Winamp user (I recently switched to MusicBee) and I was desperate to find a way to make my media keys work with it so I could play Left4Dead and skip songs while playing.
After hours of googling I found the answer: http://zaak404.wordpress.com/2011/05/09/controlling-foobar2000-with-asus-g73-media-keys/
All you have to do is to replace ASUS' DMedia.exe (C:\Program Files (x86)\ASUS\ATK Package\ATK Media) with the supplied one and you are almost done. Zaak404's versione requires you to write a small configuration file to make his program interact only with one single media player... I'm lazy (and I reinstall windows frequently) so I made my own version of his program and it doesn't require any user effort.
So, kudos to zaak404 for doing all the real (read "hard") work on this code. I just edited it to make it work "globally". I'm using windows' keybd_event function, which has been around from win 3.1 I think :D It's deprecated, but it still works in windows 7 so... I don't give a fuck about it ;)
I packed the binary in a Zip file with a .bat file. To install it just right-click install.bat and run it as administrator. Now restart your PC and all should work fine. If it doesn't it probably means ASUS changed the default DMedia.exe's directory, so you have to find the new one and copy manually .\bin\Release\DMedia.exe.
If you have any other problem, just drop a comment below.
So here we are again... A little test-sketch done in Processing (http://processing.org/) to test out the feasibility of some ideas, of my brother, about a simple art installation.
The idea is to put a projector and a camera in a dark room. The projector would show a greyish background along with computer generated rain (simple stuff, not photorealistic) and cast the shadow of the people passing against a wall.
Using the camera and some Processing/OpenFrameworks kung-fu the rain should start bouncing against shadows' edges.
Here's a screenshot of the first sketch. Just trying out some ideas with a static and simple image:
The rendering (without the OPENGL option) is quite slow, as you can see in the applet linked below. That's due to some quick'n'dirty hacks to get the job done in less time. I also lowered the number of particles created per-frame.
It also could take a lot to load because I'm using a 4MB mp3 for the background "music". I should definitely cut it :D
Whoa,
it has been a while since I wrote a post on this blog :D
Anyway, today I transcribed the "fast notes, scale and arpeggios"-style solo you can hear toward the end of this song by Von Hertzen Brothers:
I just realized what I can do when I have to study engineering but I have no will to do it :P
So, this is the download link pointing to a beautiful PDF of the sheet music:
Oh, and one last thing: I the fingering is slightly off the notes' heads, and this is not my fault :) I'm trying a new notation application and it doesn't seem to properly support this feature.
Hope you'll enjoy it... if you make a video playing the song and put it on youtube-alike please include a link to my blog (instead of linking directly to the PDF)
A few days ago I learnt this awesome solo (I've done it on the keyboards, obviously :D) by Europe.
After something like, I think, 2 hours of learning it by ear and trying to play it at normal speed I managed to do it. So, I wanted a backing track to play along without the original guitar solo and... 5 minutes with a drum machine, an improvised bass guitar line and some PADs doing chords this is what I created, a nice sounding backing track of Superstitious: Europe - Superstitious (Guitar Solo Backing Track).mp3
This post will be an accurate tutorial on how to recreate the sound used by The Who in the song mentioned in the title (the post about Baba O’Riley was a descriptive and, you know, I can’t write properly in English :D… but I think the VST I coded was somehow easy to use enough to forgive about my writing “skills”).
Reaktor (You should be able to recreate the same patch in similar modular synth software and even on your average keyboard with 2 LFO… It can also be emulated with 1 LFO and 1 arpeggiator)
Plogue Bidule (That is, a modular VST host… just because it is much more flexible than ordinary hosts, but any decent host with insert effects could do)
Some kind of Organ/Hammond VST (even crappy :D)
Note:
There’s some nice open source modular synth out there (ALSA Modular Synth, Ingen, etc…) and they can do what I do in this tutorial, but I’m not using them since they are quite instable and incomplete.
BIDULE PATCH
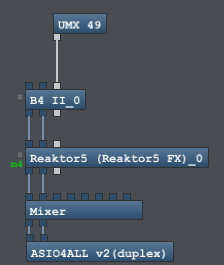
First of all, let’s create the Bidule patch and later we will focus on the Reaktor part:
The image is pretty self-explanatory but I’m gonna explain it anyway:
UMX 49 – This is my USB Keyboard and is used as a MIDI input device
B4 II – Hammond VST
Reaktor5 – Native Instruments’ masterpiece ;)
Mixer – In this patch it is useless, but it’s there by default :D
ASIO4ALL – ASIO (low latency) audio output. Be sure of using an ASIO driver or you’ll be getting weird sounds (in Windows)
WHAT WE ARE GOING TO DO IN REAKTOR Aka “What’s going on in the song?”
Well it’s pretty simple. There’s the Hammond-like sound being put on and off something like 4-5 times a second and this is achieved by modulating the amplification of the organ with a square wave with values 0-1.
Then there is a low pass filter controlled by a sinusoidal LFO.
Yeah, I told you, simple.
REAKTOR
ON/OFF
First of all, we create the on/off effect:
1:
“Tempo Info” is an object that give us the Beats Per Second setting of Reaktor, so if you take the inverse of it we get the frequency of the current tempo. “Mod Multi” is a Knob with step set to “1” and is used as a frequency multiplier (the multiplication is the “X” object). The point of having knobs is to make it easy to change parameters of the patch and tweak them easily.
The LFO (Low Frequency Oscillator, an oscillator that works at low frequencies) takes the frequency calculated and output a square wave (The output port is called “Pls” due to “Pulse”, another name for square wave) with amplitude 0.5, so we get a wave oscillating between [-0.5, 0.5].
The last block is simply adding 0.5 to the wave so we get it to oscillate between [0, 1]
2:
This isn’t a necessary step, but since the square wave contains a lot of high frequencies we get some “clicks” in the sound. So we simple filter it with a low-pass filter (LPF) and we get a square wave that is “less squared” :).
“Square Flt” is another knob.
“Log” is a Reaktor object used to turn a “frequency” signal to a “pitch” signal. If your modular synth uses plain freq signals you can avoid this.
3:
This is the easier block of the patch.
The 2 “In” are the audio inputs. The 2 “Out” are the ouputs.
“X” is, again, the multiplication.
Now we can press some key on our MIDI keyboard to hear how it sounds. Adjust the knob value as you want (for the filter knob I have 100, the other should be as accurate as possible to the original track).
LFO-CONTROLLED LPF
1:
This time we are gonna use a sinusoidal wave so we connect the “Sin” output of the LFO. “LFO Freq” and “LFO Amp” are knobs (See the last snapshot to see some nice values to start with to create your own sound).
2:
Here we have 2 knobs. The first, “LFO Filter Res”, is the parameter used to set the LPF resonance (if you don’t know what it is just play a bit with the knob and hear the difference… for the technical explanation Google something like “resonant low pass filter”).
LFO Offset is added to the LFO output to get values between [Offset-Amp, Offset+Amp] otherwise we would get the sound filtered way too much.
Both the signal are then converted to pitch signals used to control the 2 filters (one for the left channel, the other for the right one).
3:
Instead of connecting the stuff from the first part of the tutorial directly to the outputs we insert two LPF controlled by the LFO in 1.
FINAL PATCH AND PANEL
The “Mod Multi” knob value is totally wrong because the last time I opened this patch I played a bit with it ;).
FINAL WORDS
Now you are ready to have fun playing We Won’t Get Fooled Again :) Feel free to drop a comment if you need some help. I’m not gonna upload the final patch since I want you to do it with your hands and learn something :P
I should definitely try to do this in ALSA Modular Synth or Ingen, but these two softwares are way too instable… Ingen looks promising and I’ve been using it for some tests but from the SVN activity I saw it’s no longer actively developed. Too bad, someone should take the duty of doing some serious bug-hunting, develop it in the area where it lacks features and package it for the major Linux distribution (Ubuntu Maverick doesn’t include it in the official repos) because it could become the defacto open source modular synth.
I really hope the open source audio community will be able to fill the gap with Windows and Mac since I’m a huge Linux user/fan… Trust me, I tried hard to do some serious audio stuff in Linux but when I tried to do something more than the basic stuff I could not find the proper software. Ardour is amazing but it needs some improvement on the plugin/sidechaining part.
I dunno why but on Windows I get no clicks (xrun in jack’s jargon) while on Linux I get some clicks in the audio even if I lower the audio quality and all…
P.S.: I’m not a Reaktor guru so it’s probable that there are easier ways to get the job done, but I don’t know them :D


 The image is pretty self-explanatory but I’m gonna explain it anyway:
 1:
1: 1:
1:
 The “Mod Multi” knob value is totally wrong because the last time I opened this patch I played a bit with it ;).
